
Game
Gimkit Host Explained: How to Start and Run a Successful Live Game
Gimkit is a popular learning game that turns quiz questions into a fun, fast-paced experience for students. If you are a teacher, tutor, or anyone who wants to lead a group review session, you will need to know how to be a “Gimkit host.” This guide explains what a Gimkit host does, how to start a live game step by step, and what tools you can use to keep your session smooth and fun.
What Does “Gimkit Host” Mean?
A Gimkit host is the person who sets up, runs, and manages a live Gimkit game. Think of the host as the person in charge of the whole event. The host picks the kit (the set of questions), chooses a game mode, sets the rules, and watches over the game while it is happening.
Anyone with a Gimkit account can be a host. In most classrooms, this is the teacher. But tutors, club leaders, trainers, and even homeschool parents use Gimkit too. The job of the host is simple but important: make sure the game runs well and helps students learn.
It is useful to know the difference between hosting and joining. Hosting means you control the game. Joining means you are a player entering someone else’s game using a code. Many people search for “Gimkit host” when they actually want to host their own game, while others search the same term hoping to find a join code. If you are the one running the activity, you need the hosting steps below.
Step 1: LogIn and Pick a Kit
To start hosting, login to your Gimkit account from your dashboard. From there, you will see your kits, which are the question sets you can use in a game. You can:
- Use a kit you already made
- Create a brand new kit
- Copy a public kit from the Gimkit community and edit it
A good kit should match what you are teaching. If your class is reviewing vocabulary words, your kit should have vocabulary questions. If you are reviewing math facts, the questions should focus on math. This matching matters because the game is only as helpful as the content inside it.
One thing worth knowing: you can host any public kit you find on Gimkit, but full game reports are usually only available for kits you own. If tracking student progress matters to you, it is often better to host your own kit rather than grabbing a random one from another creator.
Step 2: Click “Play Live” and Choose a Mode
Once you have your kit ready, click the green “Play Live” button next to it. This opens the Mode Picker, where you can browse the different game modes Gimkit offers. Each mode changes how the game feels:
- Classic is the standard mode where students earn virtual money for correct answers and spend it on upgrades.
- The Floor is Lava slowly takes away money over time, which adds pressure and keeps players moving.
- Trust No One is a team mode where players work together to find “imposters,” which is great for building teamwork.
- 2D modes, such as Blastball or Don’t Look Down, place players inside a small game world. These modes need a browser that supports WebGL, which most modern browsers already have.
You can click “Learn More” on any mode to read a short explanation before picking it. Once you choose the mode you want, it will be marked, and you can click “Continue” to move forward.
Step 3: Set Up Your Game Options
The next screen is where you set the rules for your session. This is one of the most important steps for keeping your game under control. Common settings include:
- Game goal: how the game ends, such as a money target, a time limit, or a number of questions answered
- Connect a class: link the game to a saved class list so it is easier to manage attendance
- Join in late: turn this on if students might arrive after the game starts, or turn it off if you want a locked group with no interruptions
- Nickname Generator: when turned on, this gives each player a random, safe name instead of letting them type their own. This is a simple way to stop students from typing names that are rude or distracting.
Choosing the right settings before you start saves you a lot of trouble once the game begins. For example, turning on the Nickname Generator ahead of time means you will not have to stop the game later to fix an inappropriate name.
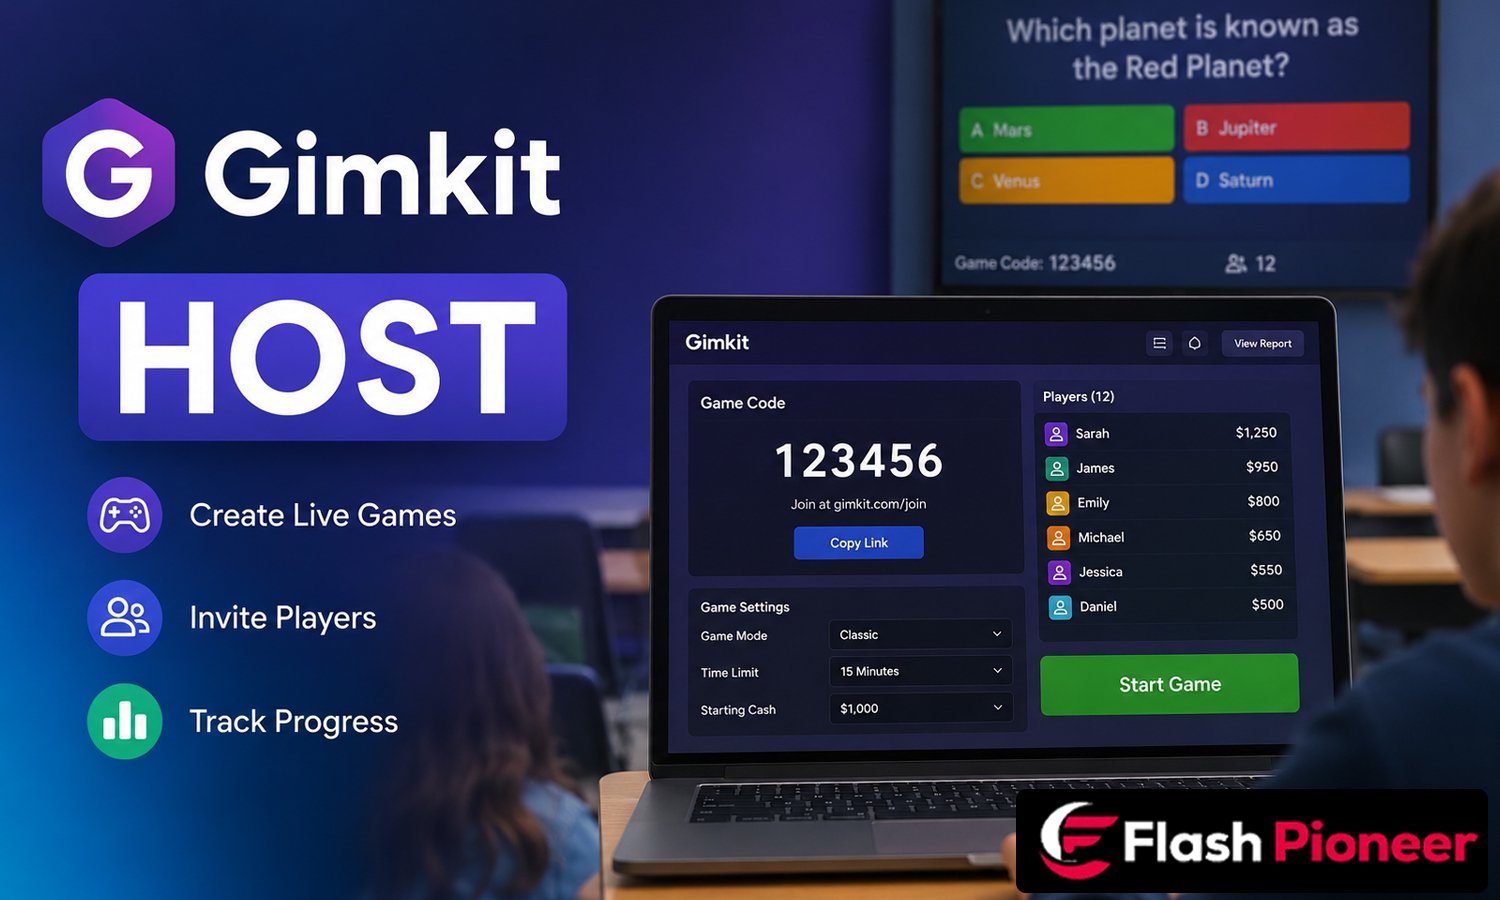
Step 4: Open the Lobby and Share the Code
After setting your options, click “Continue” again, and Gimkit will create a new lobby tab. This lobby shows your game code, which players will use to join. There are three common ways students can enter:
- Typing the game code at gimkit.com/join
- Scanning a QR code, which appears when you hover your mouse over the game code
- Clicking a direct join link, if you choose to share one
While players are joining, the lobby lets you see everyone’s name. In non-2D modes, this is your chance to remove anyone with an inappropriate name before the game starts. In 2D modes, you can choose whether to join the game yourself as a player or stay as a spectator, which gives you a wider view to manage the class.
Gimkit allows up to 500 students in one live game, although how smoothly it runs also depends on the internet connection and devices being used. For very large groups, it is smart to test the join process early so you are not stuck troubleshooting in front of the whole class.
Step 5: Start the Game and Manage It Live
Once most players have joined, click “Start Game.” You and your students will then move into the live game screen. From here, the host has several controls available in the upper right corner, including:
- Adjusting music and sound effects
- Viewing the leaderboard
- Watching or managing players, depending on the mode
- Ending the game early if needed
In most non-2D modes, you can display a live leaderboard, which is great for keeping energy high. In 2D modes, the timer can be extended if needed. You are allowed to add one minute at a time, up to a total of 59 minutes for the whole game. This gives you a bit of flexibility if the class needs a little more time to finish.
If at any point you need to stop the session, look for the End Game button. In 2D games, this is a red button found with the other game controls. In other modes, it looks like a power icon in the same corner.
After the Game: Reports and Reflection
Once the game ends, your job as host is not quite finished. Gimkit gives you a game report that shows how each student performed, including which questions were hardest and who may need extra help. You can choose to show the full results to the class or just part of them, which is helpful if you do not want to highlight who scored the lowest.
These reports are one of the most useful parts of being a Gimkit host. Instead of just having fun for a few minutes, you walk away with real information about what your students know and what they still need to practice.
Beyond Live Hosting: Other Ways to Use Gimkit
Hosting does not always have to happen in real time. Gimkit also offers:
- Assignments: you can set a kit as homework with a deadline, and students complete it at their own pace. The results still flow back into your reports automatically.
- Kit Collab: students can submit their own questions to a kit before it goes live, which makes the content feel more like a shared project.
- Gimkit Creative: a mode where hosts and students can build their own 2D worlds together, adding a creative layer beyond simple quiz questions.
These extra features mean a Gimkit host is not limited to one classroom period. You can stretch the learning experience across homework, group projects, and creative building, all while keeping track of progress through the same dashboard.
Tips for Running a Smooth Session
A few small habits can make a big difference in how your game goes:
- Test your kit and game mode once before using it with a full class
- Keep the Nickname Generator on for younger students or large groups
- Decide in advance whether you will join 2D games as a player or spectator
- Keep sound effects at a reasonable level so they add fun without becoming distracting
- Check your internet connection ahead of time, especially for bigger groups
Being a strong host is about more than clicking buttons. It is about setting things up calmly before the game starts, so the actual session runs without stress.
Final Thoughts
Hosting a Gimkit game is a simple process once you understand the steps: pick a kit, choose a mode, set your options, share the code, and start the game. The real skill comes from choosing settings that match your group size and goals, and from using the reports afterward to actually support learning. Whether you are a classroom teacher, a tutor, or a team leader, learning to host well turns a simple quiz tool into a genuinely useful teaching method.
Frequently Asked Questions
1. What is a Gimkit host?
A Gimkit host is the person who creates, controls, and manages a live Gimkit game. They choose the kit, pick the game mode, and watch over the session from start to finish.
2. Do students need an account to join a hosted game?
No, students can join a basic game without an account by visiting gimkit.com/join and entering the code. However, having an account lets them keep XP and unlock cosmetic rewards.
3. How many players can join one live game?
Gimkit allows up to 500 students in a single live game, though actual performance can depend on internet speed and device quality.
4. Can I host a kit that I did not create?
Yes, you can host any public kit from the Gimkit community. Just remember that detailed game reports are usually only available for kits you own.
5. What does the Nickname Generator do?
When turned on, it gives each student a random, safe name instead of letting them type their own. This helps avoid inappropriate usernames during a game.
6. How long can a Gimkit game last?
The maximum length for a live game is 59 minutes. Hosts can add one extra minute at a time during 2D modes, up to that limit.
7. What is the difference between hosting and joining a game?
Hosting means controlling the game, including the questions, settings, and pace. Joining means entering someone else’s game as a player using a code.
8. Can I assign a Gimkit game as homework instead of hosting it live?
Yes, this is called an assignment. You set a deadline, and students complete the kit on their own time while results are still sent to your dashboard.
9. What should I do if students cannot join my game?
Check that the code is correct, confirm the game is still open, and try sharing the QR code or join link instead of just the text code.
10. Is there a free way to host Gimkit games?
Yes, a free account lets you build basic kits and host live games with limited features. A paid Pro plan unlocks more customization, detailed reports, and other extras for regular classroom use.
Stay connected for the latest news and updates on, Flash Pioneer

Gimkit Host Explained: How to Start and Run a Successful Live Game

Who Is Elizabeth Hatcher-Travis? The Life and Story of Randy Travis’ Ex-Wife

Who Is Talita Roberta Pereira? The Life, Family, and Story of Charles Oliveira’s Wife

i’m a skincare beginner. is nivea a good starting brand compared to garnier?

Who Is Isaiah Rahsaan Iverson? The Life and Story of Allen Iverson’s Son

Laura Marie Holtzmann: Simple Life Story of Joyce Meyer’s Daughter in Easy Words

What Is PlayBattleSquare? A Simple Guide to This Gaming Blog

Webinkey.com Explained: What This Website Is and How It Works

Coyyn Explained: What It Is and How It Works in Digital Finance

Is NIVEA Safe During Pregnancy? Simple Guide Comparing Burt’s Bees and Mustela Skincare

Droven.io AWS vs Azure Comparison: Which Cloud Platform Is Better for Your Business?

CoolKingZone com: Your Simple Guide to Trending News and Useful Tips

Best Mazamorra Morada Near Me: Easy Guide to Peruvian Purple Corn Dessert Places

When Was The Innerlifthunt Released? Simple Answer and Full Game Timeline

Crackstube Explained: What It Is, How It Works, and What You Should Know in Simple Words

Osteopur Explained: Simple Guide to Bone Health Supplement and Its Benefits

Showbizztoday.com Explained: What This Entertainment News Website Is and How It Works

Drovenio IT Career Tips USA: Easy Ways to Start and Grow Your Tech Career in 2026

Rebecca Liddicoat: The Story of Robert Griffin III’s Ex-Wife and Her Life After Divorce

PixelSpinx com Explained: Simple Guide to What This Website Is and How It Works
Gimkit Host Explained: How to Start and Run a Successful Live Game
Who Is Elizabeth Hatcher-Travis? The Life and Story of Randy Travis’ Ex-Wife
Who Is Talita Roberta Pereira? The Life, Family, and Story of Charles Oliveira’s Wife
i’m a skincare beginner. is nivea a good starting brand compared to garnier?
Who Is Isaiah Rahsaan Iverson? The Life and Story of Allen Iverson’s Son
Laura Marie Holtzmann: Simple Life Story of Joyce Meyer’s Daughter in Easy Words
What Is PlayBattleSquare? A Simple Guide to This Gaming Blog
Webinkey.com Explained: What This Website Is and How It Works
Coyyn Explained: What It Is and How It Works in Digital Finance
Is NIVEA Safe During Pregnancy? Simple Guide Comparing Burt’s Bees and Mustela Skincare
-

 Celebrity2 months ago
Who Is Vanna Bardot (Vanna Bardeau)? Easy Story of Her Life and Career
-

 Tech1 month ago
Droven.io Tech Education Trends: Simple Guide to Modern Learning with AI and Digital Tools
-

 Celebrity2 months ago
Olivia Namath: Life Story of Joe Namath’s Daughter and Her Personal Journey
-

 Celebrity2 months ago
Alvin Martin: The Life Story of Whoopi Goldberg’s First Husband and Their Early Marriage Journey